
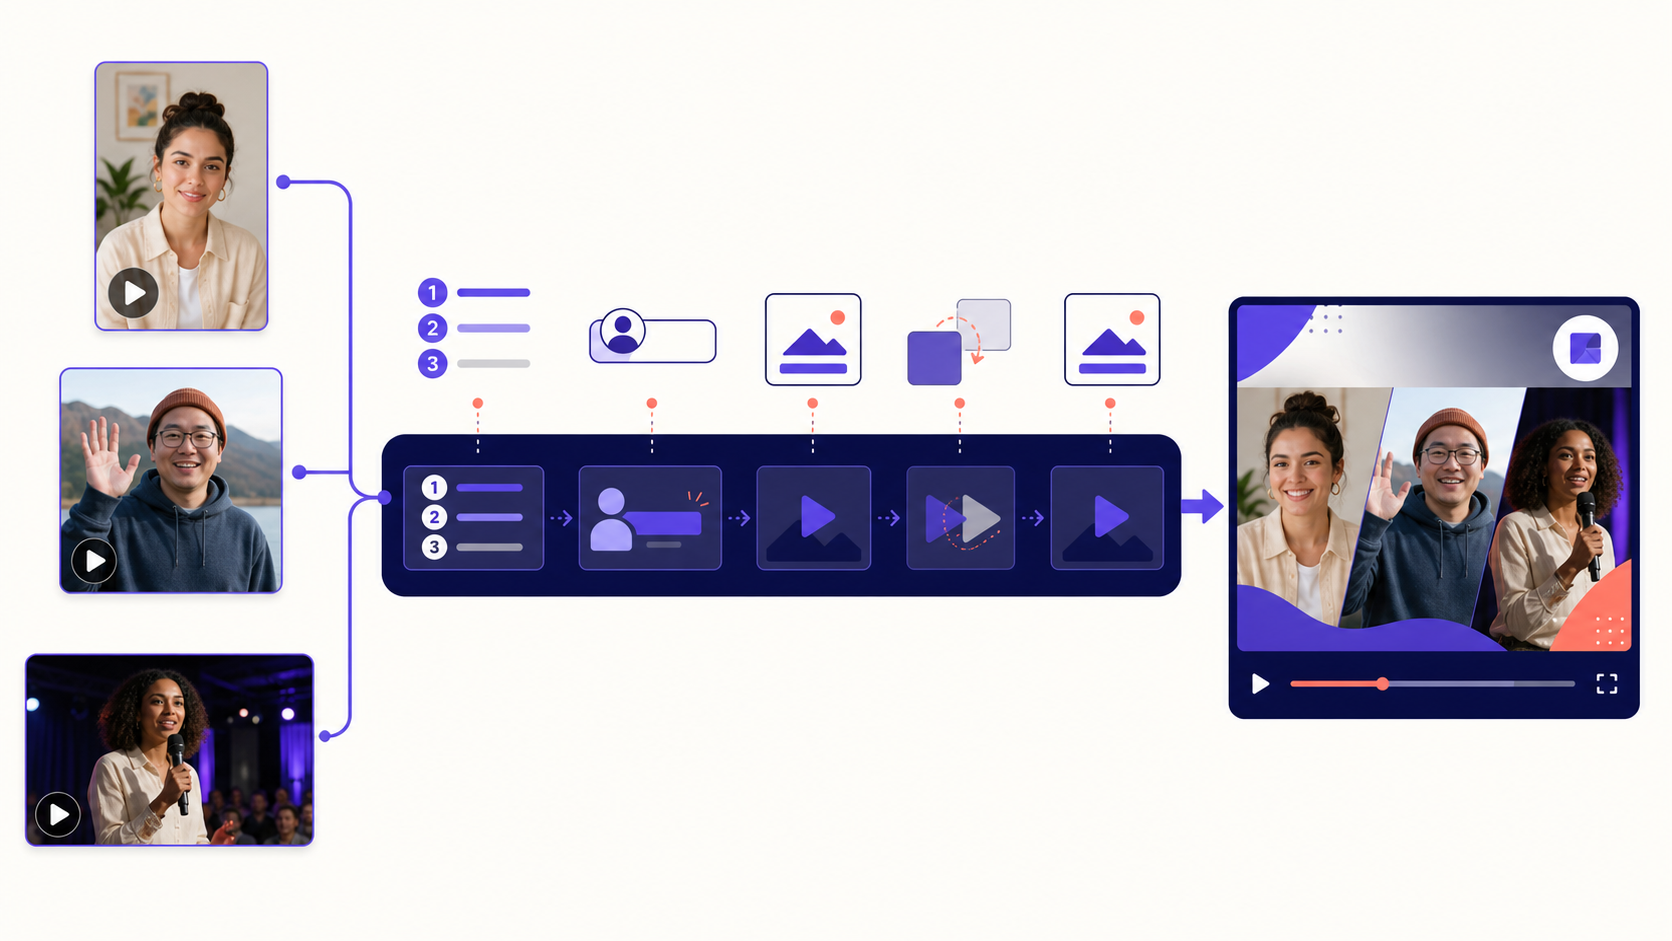
The Vloggi Compilation Builder combines selected project clips into one finished
video. You can arrange the story manually, order contributions by time, or
create a numbered listicle. The compilation can use the project’s dynamic
fields, branded overlays, intro, outro, transitions and audio.
Compilations use the same video template as the project’s Video Template Builder. This keeps the layout consistent across individual clips and the finished compilation, including landscape, portrait and square video.
Changes to the canvas, clip overlays, intro, outro or transitions in the
Compilation Builder are saved to the project’s shared video template. They
are not styling changes that belong only to one compilation.
Before you start #
You need:
- a project containing at least one processed video clip;
- permission to curate the project and create compilations; and
- a project video template configured for the required output shape.
If you want to display answers such as department, store, category or role,
create and collect those questions under Contributor Data before building
the compilation.
For more detail about layouts and dynamic data, see How to use the Vloggi Video Template Builder.
Select clips for the compilation #
- Sign in to Vloggi Studio and open the project.
- Under Curate, select Project Video Library.
- Select clips in either view. In Grid view, use the control in the
top-right corner of each clip card. In List view, use the checkbox in
each clip’s Select column. Select all also works in both views. - Select Compilation in Batch actions.
The selected clips open in the Compilation Builder. You can remove a clip or
reorder the selected clips before creating the video.
Only include clips that you are permitted to use and that support the story
you want to tell. Preview uncertain clips in the Video Library first.
Name the compilation #
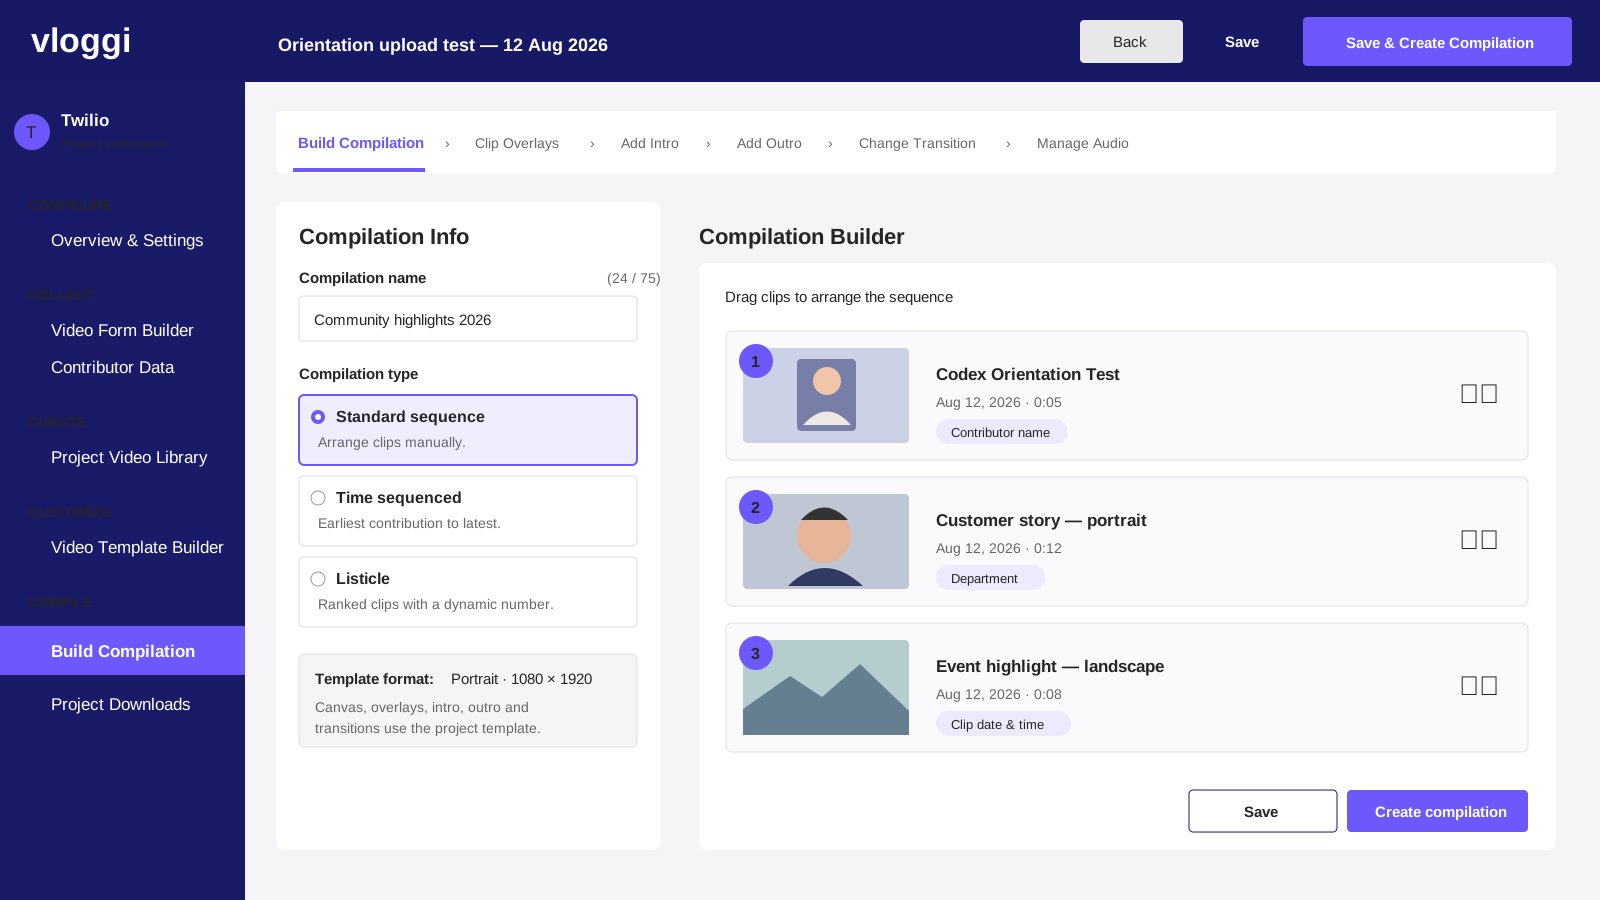

Under Build Compilation, enter a clear Compilation name. This is the
name used to identify the finished compilation in Vloggi and is also available
to an intro or outro through the dynamic Compilation name field.
Keep the title short enough to fit the intro design. A title that works well in
the Studio list can still be too long for a narrow portrait title card, so test
it in the intended format.
Choose a compilation type #
The compilation type controls how Vloggi orders or numbers the selected clips.
| Type | How it works | Best for |
|---|---|---|
| Standard sequence | Uses the manual order shown in the Compilation Builder. | Highlights, testimonials, recaps and editor-led stories. |
| Time sequenced | Orders clips automatically from the earliest contribution to the latest. | Events, progress updates, before-and-after stories and chronological evidence. |
| Listicle | Uses the selected order and adds each clip’s list position as a dynamic number. | Top-five videos, ranked entries, countdowns and step-by-step collections. |
For a standard sequence or listicle, drag the selected clips into the required
order. A time-sequenced compilation uses the date associated with each clip,
so check that the source dates are suitable before creating it.
Selecting Listicle adds a default numbered overlay to the project template.
You can restyle or reposition it under Clip Overlays. Changing back to
another compilation type removes the special listicle counter without removing
your other template elements.
Confirm the video format #
The Template format summary shows the active project canvas:
- Landscape · 1920 × 1080 for widescreen video;
- Portrait · 1080 × 1920 for mobile-first vertical video; or
- Square · 1080 × 1080 for square social and embedded video.
The Compilation Builder follows the canvas selected in Customize → Video Template Builder. A project has one active template canvas; the builder does
not create landscape, portrait and square copies at the same time.
If the format is wrong, save your work, open Video Template Builder, change
the canvas, and review every element before returning to the compilation.
Intro and outro elements also use this canvas and are fitted to it when first
added.

Add clip overlays and dynamic fields #
Open Clip Overlays to add elements that appear over each contributor clip.
You can add:
- the team watermark;
- static wording;
- dynamic text;
- images or campaign graphics;
- ratings; and
- answers collected through Contributor Data.
To add dynamic text:
- Select Dynamic Text from the add-element menu.
- Type any fixed wording that should surround the value.
- Select the + button, or type
{{, to open the smart-field menu. - Select the required field.
- Save the element, then position and style it on the canvas.
The standard clip fields available in a compilation are:
| Smart field | What it displays |
|---|---|
| Contributor name | The name confirmed for the current contribution. |
| Clip date & time | The date and time associated with the current clip. |
| Clip position (listicle) | The clip’s numbered position in a listicle. |
| Video prompt | The on-screen video question that the contributor answered in this clip. |
Example: display a contributor’s department #
Suppose a company wants each video to identify the contributor’s department.
- Open Collect → Contributor Data.
- Add the question What department are you from?
- Give the question the short label (alias) department and save it.
- When contributors upload their videos, they answer the question—for
example, Customer Support. - In Clip Overlays, add Dynamic Text and choose department from the
smart-field menu.
Vloggi inserts the correct field for you. You might place it alongside the
contributor name like this:
{{contributorName}} · {{department.response}}In the finished video, that could appear as:
Amira Khan · Customer SupportThe contributor sees the full question, while the short label makes the field
easy to recognise in the Template Builder. If no label was set, Vloggi lists it
as Question 1, Question 2, and so on. Always choose the field from the
menu rather than typing the code yourself.
If the Contributor Data question is linked to a dataset, selecting its label
opens the available dataset columns. For example, choosing a store response
could also let the template display that store’s region or store number.
Display the video prompt on screen #
Video prompts are the questions configured in Collect → Video Survey Builder, such as What did you enjoy most about the event? Each response
clip stores the particular prompt it answers.
To show that question on the video:
- Open Clip Overlays and add Dynamic Text.
- Open the smart-field menu.
- Choose Video prompt.
Vloggi inserts {{videoPrompt}} and replaces it with the correct question for
each clip. This is particularly useful in a video questionnaire compilation,
where successive clips may answer different prompts.
Video prompt displays the question asked on camera. A Contributor Data
field such as department displays an answer entered or selected elsewhere
in the submission form. They are separate types of information.
Location is not a default compilation field. If location is genuinely required
on the finished video, collect the appropriate value as a structured
Contributor Data question and use that question’s smart field.
Dynamic clip fields only resolve against the current clip. Compilation-level
values such as the compilation name and contributor list belong in the intro
or outro instead.
Do not place private contact details, confidential research responses or
internal identifiers on the video merely because the data is available.
Add and design an intro #
Open Add Intro and turn on Add / Remove to add an opening title card.
The intro can contain static text, images, the watermark and these
compilation-level dynamic fields:
- Compilation name;
- Producer name; and
- Contributor list.
Use the same positioning and text controls as the Video Template Builder. Keep
the title within safe margins and test the longest realistic title, especially
on a portrait canvas.
Turning the intro off removes it from the shared project template. If you only
want to change its wording or appearance, edit its elements instead of turning
it off.
Add and design an outro #
Open Add Outro and turn on Add / Remove to add a closing card. The outro
supports the same compilation-level dynamic fields as the intro.
An outro can be used for:
- contributor credits;
- a campaign or organisation name;
- a closing message;
- a call to action; or
- a branded end card.
Keep calls to action as static text unless their value is supplied by a
supported smart field. Check that long contributor lists fit the design and
remain readable in the selected canvas.
Choose a transition #
Open Change Transition and choose one of the basic options:
- None for a direct cut;
- Fade for a simple dissolve; or
- Wipe for a directional change between clips.
The transition gallery below the basic controls provides the other available
styles. Use one consistent transition unless the story has a strong reason to
do otherwise. Short, restrained transitions usually work best for interviews,
research responses and evidence videos.
The selected transition is saved to the project video template and applies to
the beginning, selected clips and ending according to that template.
Manage audio #
Open Manage Audio to configure the compilation’s available template audio
settings. Preview music against spoken contributions and keep it low enough
that every contributor remains clear.
Do not add music unless you have the right to use it in the finished video.
Also consider whether music is appropriate for research, compliance, evidence
or sensitive contributor content.
Save or create the compilation #
Use Save when you want to save the project template changes without
creating the compilation yet.
When everything is ready:
- Review the clip order and compilation type.
- Confirm the active canvas size.
- Check clip overlays, intro, outro, transition and audio.
- Select Save & Create Compilation.
- Confirm the action.
Vloggi saves the latest project template before creating the compilation, then
copies that template configuration into the new compilation. You can leave the
page while server-side processing continues and return to Project Downloads
to check the result.
Test before producing the final version #
Create a short test compilation before processing a large or important edit.
Include clips that test:
- long and short contributor names;
- the longest expected question response;
- portrait, square and landscape source footage;
- visually bright and dark scenes;
- the first and final clip;
- listicle numbering, if used;
- intro and outro line wrapping; and
- speech mixed with any template music.
The browser canvas is a layout guide. The encoded compilation is the
authoritative check for crop, fit, text substitution, transitions, timing and
audio.
Troubleshooting #
A dynamic value is blank
Check that the value was collected for that clip and reinsert the field from
the smart-field menu. Compilation-level fields should be used in the intro or
outro, not in a clip overlay.
The clips are in the wrong order
For Standard sequence or Listicle, return to the builder and arrange
them manually. For Time sequenced, check the dates associated with the
source clips.
The listicle number is missing
Confirm that Listicle is still selected and that the listicle position
element has not been deleted from Clip Overlays.
The text or logo is misplaced in portrait or square video
Confirm the active template format, then reposition and resize the element for
that canvas. Review safe margins and line wrapping before recreating the
compilation.
Changing the compilation changed the project template
This is expected. The Compilation Builder and Video Template Builder use the
same project template so that clip overlays, canvas, intro, outro and
transitions remain consistent.
A previous compilation did not change after editing the template
An existing compilation retains the template configuration used when it was
created. Create a new compilation to use the updated design.
Recommended checklist #
- Select only approved clips.
- Give the compilation a clear, concise name.
- Choose Standard, Time sequenced or Listicle deliberately.
- Confirm landscape, portrait or square before fine positioning.
- Keep dynamic text inside safe margins.
- Use clip data only in clip overlays.
- Use compilation name, producer and contributor list in the intro or outro.
- Check that transitions and music suit the content.
- Save and encode a short test first.
- Inspect the final encoded result before sharing or downloading it.


