
The Vloggi Video Template Builder lets you apply a consistent visual layout to
the videos collected by a project. You can add a watermark, campaign artwork,
static wording and personalised text that changes for each contributor or
clip.
For example, one template could place your watermark in the top-right corner
and show a lower-third containing each contributor’s name, location and store
number. Vloggi replaces the dynamic fields and renders the finished overlays
as part of video processing, so you do not need to edit every clip manually.
You can build templates for:
- landscape video at 1920 × 1080 pixels;
- portrait video at 1080 × 1920 pixels; or
- square video at 1080 × 1080 pixels.
Before you start #
It helps to configure these parts of the project first:
- Branding: upload the team’s video watermark and choose the brand font and
colours. - Contributor Data: create any questions whose answers you want to display
dynamically, such as store, department, role or category. - Video Form Builder: confirm that the project instructions and collection
workflow are ready.
Contributor questions should be created before the dynamic text is added. If a
question is renamed, reordered or removed later, check any template element
that uses it.
For the cleanest watermark, use a transparent PNG or WebP. A logo with a solid
white background will appear as a visible box over the video.
Open the Template Builder #
- Sign in to Vloggi Studio and open the project.
- Under Customize, select Video Template Builder.
- Select the canvas size you want to produce.
- Use the + menu beside the canvas to add elements.
- Select Save in the project header when the layout is ready.
The central canvas is a design preview. Select an element on the canvas to edit
its appearance, position, timing or layer order in the controls beside it.
Choose the canvas size first #
At the top of the builder, choose Landscape, Portrait or Square.
| Canvas | Output size | Typical use |
|---|---|---|
| Landscape | 1920 × 1080 | Websites, presentations, YouTube and widescreen displays |
| Portrait | 1080 × 1920 | Reels, Stories, Shorts and mobile-first viewing |
| Square | 1080 × 1080 | Social feeds, galleries and flexible embedded layouts |
The canvas is the shape of the finished rendered video, not a crop instruction
for the contributor. Vloggi fits the submitted footage into the selected output
and can use a background treatment when the source and canvas have different
shapes.
Choose the intended canvas before carefully positioning elements. If you
switch canvas later, Vloggi adapts the existing layout to the new dimensions,
but you should review the size, line breaks and position of every element
before saving.
A project template has one active canvas size. Changing the canvas changes
the output format for that template; it does not create three simultaneous
variants.
Add a watermark #
- Open the + menu and select Watermark.
- Drag the watermark to its intended position.
- Resize it using the element handles or the width and height controls.
- Use Image opacity if the mark needs to be more subtle.
- Add fade timing if it should appear for only part of the clip.
The watermark comes from the team’s saved Video watermark in Branding. It
is separate from the full-colour logo used elsewhere in Vloggi.
Keep the mark comfortably inside the edge of the canvas. A margin of roughly
4–7% is a useful starting point because some social platforms place their own
controls and captions near the edges.
Add static text #
Static text is wording that remains the same on every rendered clip. It is
useful for labels such as:
- Official submission
- Customer story
- Sydney · 2026
- Confidential research response
To add it:
- Open the + menu and select Static Text.
- Enter the wording and select OK.
- Select the new text element on the canvas.
- Adjust the font size, colour, bold, italic, uppercase, background and text
alignment. - Drag and resize the text box, or enter exact position and size values.
Use a background colour or shadowed artwork behind the text when the submitted
footage may be visually busy. Check that the text remains readable over both
light and dark scenes.
Add dynamic text #
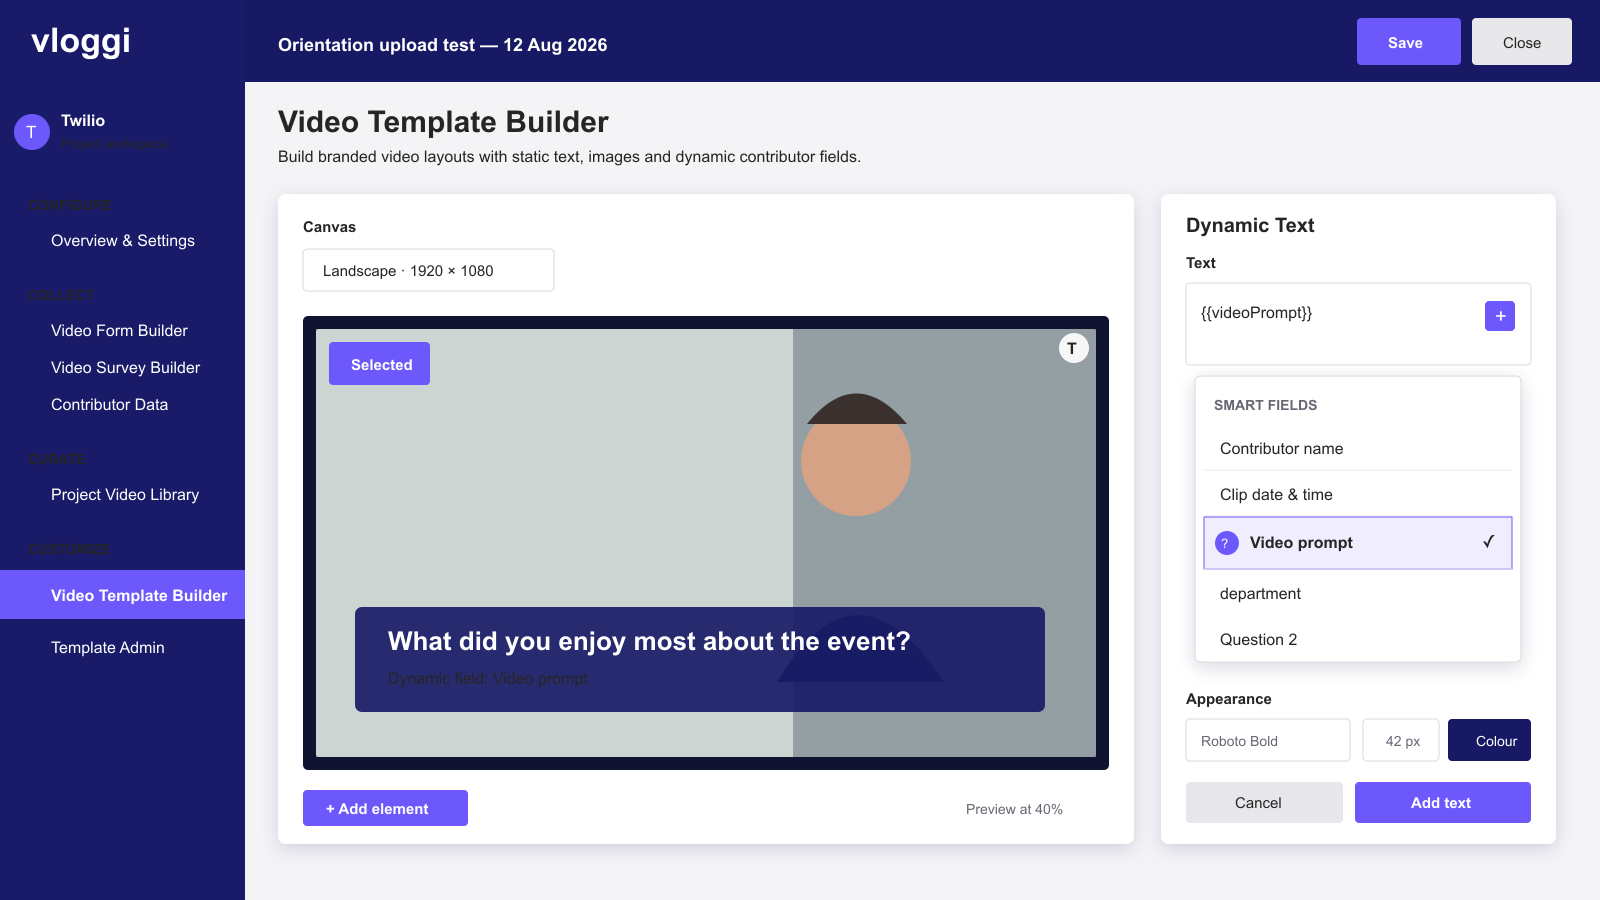
Dynamic text contains smart fields. Vloggi replaces each smart field with the
value belonging to the current clip when the video is rendered.
- Open the + menu and select Dynamic Text.
- Type any fixed wording that should surround the value.
- Select the + button in the Dynamic Text window and choose a smart field.
You can also type{{to open the field menu at the cursor. - Combine more than one field if required.
- Select OK, then style and position the text element on the canvas.
For example:
Contributed by {{contributorName}}or:
{{contributorName}} · {{place}} · {{date}}Use the smart-field menu wherever possible. It inserts the supported field
name exactly and avoids broken placeholders caused by spelling or punctuation.
Standard smart fields #
The per-clip layout currently provides these standard fields:
| Smart field | What it displays |
|---|---|
| Contributor name | The full name confirmed by the contributor during submission |
| Clip date & time | The date and time associated with the clip |
| Location | Available location data associated with the contribution |
| Place name | The available human-readable place name |
| Clip position | The clip’s position in the ordered list used for output |
| Video prompt | The on-screen video question answered by the current clip |

A field can be empty when the relevant information was not collected or is not
available for that clip. Design the surrounding sentence so that a missing
optional value does not leave confusing punctuation or wording.
The contributor name is collected as part of Vloggi’s consent and submission
flow. If a contributor arrives through a prefilled upload link, the name
parameter can prefill this value before they review and confirm it.
Use answers from Contributor Data #
Questions created in Contributor Data also appear in the Dynamic Text smart
field menu.
For a normal question, select the question to insert its response. A template
could therefore display:
Store: {{store.response}}The exact smart field is inserted by Vloggi and depends on the question’s
alias. If the question has no alias, Vloggi uses its question number instead.
For a question linked to a dataset, open the question in the smart-field menu
and select the particular dataset column you want to show. This lets one
contributor selection supply several controlled values—for example, a store
name, region and store number.
Only use a contributor answer when it is appropriate to display that
information in the rendered video. Do not expose private contact information,
confidential research responses or internal identifiers simply because the
field is available.
Integration references are different from contributor fields #
A respondent or submission reference passed through a prefilled upload link is
stored as integration hand-off data. It does not automatically become a visible
Contributor Data question or a Template Builder smart field.
If the value is only needed to match Vloggi’s webhook back to another system,
keep it as an opaque externalReference. If it genuinely needs to appear on
the rendered video, create an appropriate Contributor Data field and make sure
the contributor or source workflow supplies that field through the supported
collection process.
Add an image or campaign graphic #
Use Image to add a visual asset from the template asset library. Images can
be used for campaign logos, decorative bars, icons, frames or backgrounds
behind text.
After adding an image, you can:
- drag and resize it;
- set an exact position and size;
- change its opacity;
- fade it in or out; and
- move it forward or backward in the layer stack.
Transparent images are usually the most flexible. Optimise large source files
before uploading them so that the asset is sharp without being unnecessarily
heavy.
Add a rating #
Select Rating when the project collects a rating that should be represented
visually as stars. Position and style the rating like another image element.
Test this with a real project response. If no usable rating was collected for
a clip, the rating element may have no meaningful value to display.
Position, size and layer elements #
You can drag and resize elements directly on the canvas. For precise layouts,
open Position and edit:
- x and y for the element’s location;
- w and h for its width and height; and
- horizontal and vertical padding for text.
Use Center to centre the selected element horizontally.
When elements overlap, use:
- Bring layer forward;
- Send layer backward;
- Send to front; or
- Send to back.
A common lower-third structure is a coloured image or text background on a
lower layer, with dynamic text on the layer above it.
Control when an element appears #
Open Special effects for the selected element to add a fade in or fade out.
Each effect has:
- Start at: the time in seconds when the effect begins; and
- Duration: how long the fade takes.
For example, a lower-third could fade in at 0.5 seconds over 0.4 seconds, remain
visible while the contributor is introduced, and then fade out at 5 seconds.
Avoid assuming every clip is long. If an element starts after a short clip has
already ended, it will never appear. Test timing against the shortest videos
you expect to receive.
Edit, copy and undo #
Select an element before editing it. The builder supports the usual Mac
shortcuts for common layout work:
Command-Cto copy an element;Command-Vto paste it; andCommand-Zto undo recent template changes.
Copied elements are placed at the top-left initially so they do not sit exactly
on top of the original. Reposition the copy and check its layer order.
Save and test the template #
- Review every element in the visual canvas.
- Select Save in the project header.
- Make a short test submission containing representative contributor data.
- Allow Vloggi to process the test clip.
- Review the rendered result in the Project Video Library.
- Check spelling, field substitution, line wrapping, safe margins, opacity,
timing and the watermark’s transparency. - Repeat the test with portrait, landscape or square source footage that is
likely to be submitted to the project.
The browser canvas is a layout guide; the processed clip is the authoritative
preview of the final render. Saving a new layout does not rewrite an already
downloaded file. Existing processed clips may need to be regenerated or
reprocessed before they show a changed template.
Recommended design checklist #
- Choose the output canvas before fine positioning.
- Keep important text and logos away from the outer edges.
- Use a transparent watermark with enough contrast.
- Keep dynamic text boxes wide enough for the longest realistic answer.
- Prefer short labels over long sentences on mobile video.
- Allow for missing optional values.
- Do not display sensitive personal or research data.
- Test the shortest expected clip before adding late fade timings.
- Test light, dark and visually busy footage.
- Save, process and inspect a real test clip before opening the project to
contributors.
Troubleshooting #
A dynamic field appears literally with braces
Delete and reinsert it from the smart-field menu. Confirm that the Contributor
Data question still exists and has not been renamed or removed.
A dynamic value is blank
Check that the value was actually collected for that contributor or clip.
Location and place fields may not be available for every submission.
A question is missing from the smart-field menu
Save the question in Contributor Data first, then reopen the Dynamic Text
window. Dataset-linked questions expose their available columns in a submenu.
Text is cut off or wraps badly
Increase the text box width or height, reduce the font size, shorten the fixed
wording and test with the longest realistic response.
The watermark has a white rectangle
Replace it in Branding with a genuinely transparent PNG or WebP. Lowering
opacity will make the rectangle fainter but will not remove its background.
The layout changed after switching canvas size
The elements were adapted to different output dimensions. Review and adjust
each element on the new canvas, then save and render another test clip.
An integration reference is not available as dynamic text
That is expected. Prefilled-link references are stored for system matching and
webhooks, not as visible contributor answers.


